Databases and the Doctrine ORM 
Screencast
Do you prefer video tutorials? Check out the Doctrine screencast series.
Symfony provides all the tools you need to use databases in your applications thanks to Doctrine, the best set of PHP libraries to work with databases. These tools support relational databases like MySQL and PostgreSQL and also NoSQL databases like MongoDB.
Databases are a broad topic, so the documentation is divided in three articles:
- This article explains the recommended way to work with relational databases
in Symfony applications;この記事では、Symfony アプリケーションでリレーショナル データベースを操作するための推奨される方法について説明します。
- Read this other article if you need low-level access
to perform raw SQL queries to relational databases (similar to PHP's PDO);リレーショナル データベース (PHP の PDO と同様) に対して生の SQL クエリを実行するために低レベルのアクセスが必要な場合は、この別の記事をお読みください。
- Read DoctrineMongoDBBundle docs if you are working with MongoDB databases.MongoDB データベースを使用している場合は、DoctrineMongoDBBundle のドキュメントをお読みください。
Installing Doctrine 
First, install Doctrine support via the orm Symfony pack,
as well as the MakerBundle, which will help generate some code:
1 2 |
$ composer require symfony/orm-pack
$ composer require --dev symfony/maker-bundle
|
Configuring the Database 
The database connection information is stored as an environment variable called
DATABASE_URL. For development, you can find and customize this inside .env:
1 2 3 4 5 6 7 8 9 10 11 12 13 14 15 16 |
# .env (or override DATABASE_URL in .env.local to avoid committing your changes)

# customize this line!
DATABASE_URL="mysql://db_user:db_password@127.0.0.1:3306/db_name?serverVersion=5.7"

# to use mariadb:
DATABASE_URL="mysql://db_user:db_password@127.0.0.1:3306/db_name?serverVersion=mariadb-10.5.8"

# to use sqlite:
# DATABASE_URL="sqlite:///%kernel.project_dir%/var/app.db"

# to use postgresql:
# DATABASE_URL="postgresql://db_user:db_password@127.0.0.1:5432/db_name?serverVersion=11&charset=utf8"

# to use oracle:
# DATABASE_URL="oci8://db_user:db_password@127.0.0.1:1521/db_name"
|
Caution
If the username, password, host or database name contain any character considered
special in a URI (such as +, @, $, #, /, :, *, !),
you must encode them. See RFC 3986 for the full list of reserved characters or
use the urlencode function to encode them. In this case you need to
remove the resolve: prefix in config/packages/doctrine.yaml to avoid errors:
url: '%env(resolve:DATABASE_URL)%'
Now that your connection parameters are setup, Doctrine can create the db_name
database for you:
1 |
$ php bin/console doctrine:database:create
|
There are more options in config/packages/doctrine.yaml that you can configure,
including your server_version (e.g. 5.7 if you're using MySQL 5.7), which may
affect how Doctrine functions.
Tip
There are many other Doctrine commands. Run php bin/console list doctrine
to see a full list.
Creating an Entity Class 
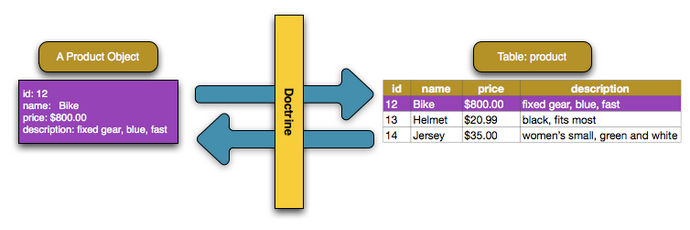
Suppose you're building an application where products need to be displayed.
Without even thinking about Doctrine or databases, you already know that
you need a Product object to represent those products.
You can use the make:entity command to create this class and any fields you
need. The command will ask you some questions - answer them like done below:
1 2 3 4 5 6 7 8 9 10 11 12 13 14 15 16 17 18 19 20 21 22 23 24 25 26 27 28 29 |
$ php bin/console make:entity

Class name of the entity to create or update:
> Product

New property name (press <return> to stop adding fields):
> name

Field type (enter ? to see all types) [string]:
> string

Field length [255]:
> 255

Can this field be null in the database (nullable) (yes/no) [no]:
> no

New property name (press <return> to stop adding fields):
> price

Field type (enter ? to see all types) [string]:
> integer

Can this field be null in the database (nullable) (yes/no) [no]:
> no

New property name (press <return> to stop adding fields):
>
(press enter again to finish)
|
Whoa! You now have a new src/Entity/Product.php file:
1 2 3 4 5 6 7 8 9 10 11 12 13 14 15 16 17 18 19 20 21 22 23 24 25 26 27 |
// src/Entity/Product.php
namespace App\Entity;

use App\Repository\ProductRepository;
use Doctrine\ORM\Mapping as ORM;

 #[ORM\Entity(repositoryClass: ProductRepository::class)]
class Product
{
    #[ORM\Id]
    #[ORM\GeneratedValue]
    #[ORM\Column]
    private int $id;

    #[ORM\Column(length: 255)]
    private string $name;

    #[ORM\Column]
    private int $price;

    public function getId(): ?int
    {
        return $this->id;
    }

    // ... getter and setter methods
}
|
Note
Starting in v1.44.0 - MakerBundle only supports entities using PHP attributes.
Note
Confused why the price is an integer? Don't worry: this is just an example. But, storing prices as integers (e.g. 100 = $1 USD) can avoid rounding issues.
Note
If you are using an SQLite database, you'll see the following error:
PDOException: SQLSTATE[HY000]: General error: 1 Cannot add a NOT NULL
column with default value NULL. Add a nullable=true option to the
description property to fix the problem.
Caution
There is a limit of 767 bytes for the index key prefix when using
InnoDB tables in MySQL 5.6 and earlier versions. String columns with 255
character length and utf8mb4 encoding surpass that limit. This means
that any column of type string and unique=true must set its
maximum length to 190. Otherwise, you'll see this error:
"[PDOException] SQLSTATE[42000]: Syntax error or access violation:
1071 Specified key was too long; max key length is 767 bytes".
This class is called an "entity". And soon, you'll be able to save and query Product
objects to a product table in your database. Each property in the Product
entity can be mapped to a column in that table. This is usually done with attributes:
the #[ORM\Column(...)] comments that you see above each property:
The make:entity command is a tool to make life easier. But this is your code:
add/remove fields, add/remove methods or update configuration.
Doctrine supports a wide variety of field types, each with their own options.
To see a full list, check out Doctrine's Mapping Types documentation.
If you want to use XML instead of annotations, add type: xml and
dir: '%kernel.project_dir%/config/doctrine' to the entity mappings in your
config/packages/doctrine.yaml file.
Caution
Be careful not to use reserved SQL keywords as your table or column names
(e.g. GROUP or USER). See Doctrine's Reserved SQL keywords documentation
for details on how to escape these. Or, change the table name with
#[ORM\Table(name: 'groups')] above the class or configure the column name with
the name: 'group_name' option.
Migrations: Creating the Database Tables/Schema 
The Product class is fully-configured and ready to save to a product table.
If you just defined this class, your database doesn't actually have the product
table yet. To add it, you can leverage the DoctrineMigrationsBundle, which is
already installed:
1 |
$ php bin/console make:migration
|
If everything worked, you should see something like this:
1 2 3 4 |
SUCCESS!

Next: Review the new migration "migrations/Version20211116204726.php"
Then: Run the migration with php bin/console doctrine:migrations:migrate
|
If you open this file, it contains the SQL needed to update your database! To run that SQL, execute your migrations:
1 |
$ php bin/console doctrine:migrations:migrate
|
This command executes all migration files that have not already been run against your database. You should run this command on production when you deploy to keep your production database up-to-date.
Migrations & Adding more Fields 
But what if you need to add a new field property to Product, like a
description? You can edit the class to add the new property. But, you can
also use make:entity again:
1 2 3 4 5 6 7 8 9 10 11 12 13 14 15 16 17 |
$ php bin/console make:entity

Class name of the entity to create or update
> Product

New property name (press <return> to stop adding fields):
> description

Field type (enter ? to see all types) [string]:
> text

Can this field be null in the database (nullable) (yes/no) [no]:
> no

New property name (press <return> to stop adding fields):
>
(press enter again to finish)
|
This adds the new description property and getDescription() and setDescription()
methods:
1 2 3 4 5 6 7 8 9 10 11 12 |
// src/Entity/Product.php
  // ...

  class Product
  {
      // ...

+     #[ORM\Column(type: 'text')]
+     private $description;

      // getDescription() & setDescription() were also added
  }
|
The new property is mapped, but it doesn't exist yet in the product table. No
problem! Generate a new migration:
1 |
$ php bin/console make:migration
|
This time, the SQL in the generated file will look like this:
1 |
ALTER TABLE product ADD description LONGTEXT NOT NULL
|
The migration system is smart. It compares all of your entities with the current state of the database and generates the SQL needed to synchronize them! Like before, execute your migrations:
1 |
$ php bin/console doctrine:migrations:migrate
|
This will only execute the one new migration file, because DoctrineMigrationsBundle
knows that the first migration was already executed earlier. Behind the scenes, it
manages a migration_versions table to track this.
Each time you make a change to your schema, run these two commands to generate the migration and then execute it. Be sure to commit the migration files and execute them when you deploy.
Tip
If you prefer to add new properties manually, the make:entity command can
generate the getter & setter methods for you:
1 |
$ php bin/console make:entity --regenerate
|
If you make some changes and want to regenerate all getter/setter methods,
also pass --overwrite.
Persisting Objects to the Database 
It's time to save a Product object to the database! Let's create a new controller
to experiment:
1 |
$ php bin/console make:controller ProductController
|
Inside the controller, you can create a new Product object, set data on it,
and save it:
1 2 3 4 5 6 7 8 9 10 11 12 13 14 15 16 17 18 19 20 21 22 23 24 25 26 27 28 29 30 |
// src/Controller/ProductController.php
namespace App\Controller;

// ...
use App\Entity\Product;
use Doctrine\Persistence\ManagerRegistry;
use Symfony\Component\HttpFoundation\Response;
use Symfony\Component\Routing\Annotation\Route;

class ProductController extends AbstractController
{
    #[Route('/product', name: 'create_product')]
    public function createProduct(ManagerRegistry $doctrine): Response
    {
        $entityManager = $doctrine->getManager();

        $product = new Product();
        $product->setName('Keyboard');
        $product->setPrice(1999);
        $product->setDescription('Ergonomic and stylish!');

        // tell Doctrine you want to (eventually) save the Product (no queries yet)
        $entityManager->persist($product);

        // actually executes the queries (i.e. the INSERT query)
        $entityManager->flush();

        return new Response('Saved new product with id '.$product->getId());
    }
}
|
Try it out!
http://localhost:8000/product
Congratulations! You just created your first row in the product table. To prove it,
you can query the database directly:
1 2 3 4 |
$ php bin/console dbal:run-sql 'SELECT * FROM product'

# on Windows systems not using Powershell, run this command instead:
# php bin/console dbal:run-sql "SELECT * FROM product"
|
Take a look at the previous example in more detail:
- line 13 The
ManagerRegistry $doctrineargument tells Symfony to inject the Doctrine service into the controller method.13 行目 ManagerRegistry の $doctrine 引数は、コントローラー メソッドに Doctrine サービスを注入するよう Symfony に指示します。 - line 15 The
$doctrine->getManager()method gets Doctrine's entity manager object, which is the most important object in Doctrine. It's responsible for saving objects to, and fetching objects from, the database.15 行目 $doctrine->getManager() メソッドは、Doctrine で最も重要なオブジェクトである Doctrine のセンティマネージャ オブジェクトを取得します。オブジェクトをデータベースに保存したり、データベースからオブジェクトをフェッチしたりします。 - lines 17-20 In this section, you instantiate and work with the
$productobject like any other normal PHP object.行 17 ~ 20 このセクションでは、他の通常の PHP オブジェクトと同様に、$productobject をインスタンス化し、操作します。 - line 23 The
persist($product)call tells Doctrine to "manage" the$productobject. This does not cause a query to be made to the database.23 行目 persist($product) 呼び出しは、Doctrine に $product オブジェクトを「管理」するように指示します。これにより、データベースに対してクエリが実行されることはありません。 - line 26 When the
flush()method is called, Doctrine looks through all of the objects that it's managing to see if they need to be persisted to the database. In this example, the$productobject's data doesn't exist in the database, so the entity manager executes anINSERTquery, creating a new row in theproducttable.26 行目 flush() メソッドが呼び出されると、Doctrine は管理しているすべてのオブジェクトを調べて、データベースに永続化する必要があるかどうかを確認します。この例では、$product オブジェクトのデータがデータベースに存在しないため、エンティティ マネージャーは INSERT クエリを実行し、product テーブルに新しい行を作成します。
Note
If the flush() call fails, a Doctrine\ORM\ORMException exception
is thrown. See Transactions and Concurrency.
Whether you're creating or updating objects, the workflow is always the same: Doctrine is smart enough to know if it should INSERT or UPDATE your entity.
Validating Objects 
The Symfony validator reuses Doctrine metadata to perform some basic validation tasks:
1 2 3 4 5 6 7 8 9 10 11 12 13 14 15 16 17 18 19 20 21 22 23 24 25 26 27 28 29 30 |
// src/Controller/ProductController.php
namespace App\Controller;

use App\Entity\Product;
use Symfony\Component\HttpFoundation\Response;
use Symfony\Component\Routing\Annotation\Route;
use Symfony\Component\Validator\Validator\ValidatorInterface;
// ...

class ProductController extends AbstractController
{
    #[Route('/product', name: 'create_product')]
    public function createProduct(ValidatorInterface $validator): Response
    {
        $product = new Product();
        // This will trigger an error: the column isn't nullable in the database
        $product->setName(null);
        // This will trigger a type mismatch error: an integer is expected
        $product->setPrice('1999');

        // ...

        $errors = $validator->validate($product);
        if (count($errors) > 0) {
            return new Response((string) $errors, 400);
        }

        // ...
    }
}
|
Although the Product entity doesn't define any explicit
validation configuration, Symfony introspects the Doctrine
mapping configuration to infer some validation rules. For example, given that
the name property can't be null in the database, a
NotNull constraint is added automatically
to the property (if it doesn't contain that constraint already).
The following table summarizes the mapping between Doctrine metadata and the corresponding validation constraints added automatically by Symfony:
| Doctrine attribute | Validation constraint | Notes |
|---|---|---|
nullable=false |
NotNull | Requires installing the PropertyInfo component |
type |
Type | Requires installing the PropertyInfo component |
unique=true |
UniqueEntity | |
length |
Length |
Because the Form component as well as API Platform internally use the Validator component, all your forms and web APIs will also automatically benefit from these automatic validation constraints.
This automatic validation is a nice feature to improve your productivity, but it doesn't replace the validation configuration entirely. You still need to add some validation constraints to ensure that data provided by the user is correct.
Fetching Objects from the Database 
Fetching an object back out of the database is even easier. Suppose you want to
be able to go to /product/1 to see your new product:
1 2 3 4 5 6 7 8 9 10 11 12 13 14 15 16 17 18 19 20 21 22 23 24 25 26 27 28 |
// src/Controller/ProductController.php
namespace App\Controller;

use App\Entity\Product;
use Symfony\Component\HttpFoundation\Response;
use Symfony\Component\Routing\Annotation\Route;
// ...

class ProductController extends AbstractController
{
    #[Route('/product/{id}', name: 'product_show')]
    public function show(ManagerRegistry $doctrine, int $id): Response
    {
        $product = $doctrine->getRepository(Product::class)->find($id);

        if (!$product) {
            throw $this->createNotFoundException(
                'No product found for id '.$id
            );
        }

        return new Response('Check out this great product: '.$product->getName());

        // or render a template
        // in the template, print things with {{ product.name }}
        // return $this->render('product/show.html.twig', ['product' => $product]);
    }
}
|
Another possibility is to use the ProductRepository using Symfony's autowiring
and injected by the dependency injection container:
1 2 3 4 5 6 7 8 9 10 11 12 13 14 15 16 17 18 19 20 |
// src/Controller/ProductController.php
namespace App\Controller;

use App\Entity\Product;
use App\Repository\ProductRepository;
use Symfony\Component\HttpFoundation\Response;
use Symfony\Component\Routing\Annotation\Route;
// ...

class ProductController extends AbstractController
{
    #[Route('/product/{id}', name: 'product_show')]
    public function show(int $id, ProductRepository $productRepository): Response
    {
        $product = $productRepository
            ->find($id);

        // ...
    }
}
|
Try it out!
http://localhost:8000/product/1
http://localhost:8000/product/1
When you query for a particular type of object, you always use what's known as its "repository". You can think of a repository as a PHP class whose only job is to help you fetch entities of a certain class.
Once you have a repository object, you have many helper methods:
1 2 3 4 5 6 7 8 9 10 11 12 13 14 15 16 17 18 19 20 21 |
$repository = $doctrine->getRepository(Product::class);

// look for a single Product by its primary key (usually "id")
$product = $repository->find($id);

// look for a single Product by name
$product = $repository->findOneBy(['name' => 'Keyboard']);
// or find by name and price
$product = $repository->findOneBy([
    'name' => 'Keyboard',
    'price' => 1999,
]);

// look for multiple Product objects matching the name, ordered by price
$products = $repository->findBy(
    ['name' => 'Keyboard'],
    ['price' => 'ASC']
);

// look for *all* Product objects
$products = $repository->findAll();
|
You can also add custom methods for more complex queries! More on that later in the Databases and the Doctrine ORM section.
Tip
When rendering an HTML page, the web debug toolbar at the bottom of the page will display the number of queries and the time it took to execute them:
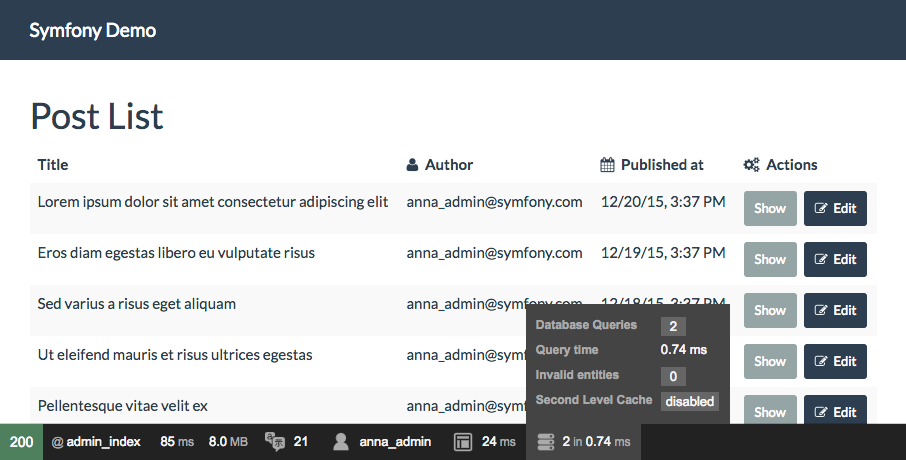
If the number of database queries is too high, the icon will turn yellow to
indicate that something may not be correct. Click on the icon to open the
Symfony Profiler and see the exact queries that were executed. If you don't
see the web debug toolbar, install the profiler Symfony pack
by running this command: composer require --dev symfony/profiler-pack.
Automatically Fetching Objects (EntityValueResolver) 
6.2
Entity Value Resolver was introduced in Symfony 6.2.
2.7.1
Autowiring of the EntityValueResolver was introduced in DoctrineBundle 2.7.1.
In many cases, you can use the EntityValueResolver to do the query for you
automatically! You can simplify the controller to:
1 2 3 4 5 6 7 8 9 10 11 12 13 14 15 16 17 18 |
// src/Controller/ProductController.php
namespace App\Controller;

use App\Entity\Product;
use App\Repository\ProductRepository;
use Symfony\Component\HttpFoundation\Response;
use Symfony\Component\Routing\Annotation\Route;
// ...

class ProductController extends AbstractController
{
    #[Route('/product/{id}')]
    public function show(Product $product): Response
    {
        // use the Product!
        // ...
    }
}
|
That's it! The bundle uses the {id} from the route to query for the Product
by the id column. If it's not found, a 404 page is generated.
This behavior is enabled by default on all your controllers. You can
disable it by setting the doctrine.orm.controller_resolver.auto_mapping
config option to false.
When disabled, you can enable it individually on the desired controllers by
using the MapEntity attribute:
1 2 3 4 5 6 7 8 9 10 11 12 13 14 15 16 17 18 19 20 |
// src/Controller/ProductController.php
namespace App\Controller;

use App\Entity\Product;
use Symfony\Bridge\Doctrine\Attribute\MapEntity;
use Symfony\Component\HttpFoundation\Response;
use Symfony\Component\Routing\Annotation\Route;
// ...

class ProductController extends AbstractController
{
    #[Route('/product/{id}')]
    public function show(
        #[MapEntity]
        Product $product
    ): Response {
        // use the Product!
        // ...
    }
}
|
Tip
When enabled globally, it's possible to disabled the behavior on a specific
controller, by using the MapEntity set to disabled.
- public function show(
- #[CurrentUser] #[MapEntity(disabled: true)] User $user
#[CurrentUser]#[MapEntity(disabled: true)]User $user- ): Response {
- // User is not resolved by the EntityValueResolver // ...
// ユーザーは EntityValueResolver によって解決されません // ...}
}
Fetch Automatically 
If your route wildcards match properties on your entity, then the resolver will automatically fetch them:
1 2 3 4 5 6 7 8 9 10 11 12 13 14 15 |
/**
 * Fetch via primary key because {id} is in the route.
 */
#[Route('/product/{id}')]
public function showByPk(Post $post): Response
{
}

/**
 * Perform a findOneBy() where the slug property matches {slug}.
 */
#[Route('/product/{slug}')]
public function showBySlug(Post $post): Response
{
}
|
Automatic fetching works in these situations:
- If
{id}is in your route, then this is used to fetch by primary key via thefind()method.{id} がルートにある場合、これは find() メソッドを介して主キーで取得するために使用されます。 - The resolver will attempt to do a
findOneBy()fetch by using all of the wildcards in your route that are actually properties on your entity (non-properties are ignored).リゾルバは、実際にはエンティティのプロパティであるルート内のすべてのワイルドカードを使用して、findOneBy() フェッチを実行しようとします (プロパティ以外は無視されます)。
You can control this behavior by actually adding the MapEntity
attribute and using the MapEntity options.
Fetch via an Expression 
If automatic fetching doesn't work, you can write an expression using the ExpressionLanguage component:
1 2 3 4 5 6 |
#[Route('/product/{product_id}')]
public function show(
    #[MapEntity(expr: 'repository.find(product_id)')]
    Product $product
): Response {
}
|
In the expression, the repository variable will be your entity's
Repository class and any route wildcards - like {product_id} are
available as variables.
This can also be used to help resolve multiple arguments:
1 2 3 4 5 6 7 |
#[Route('/product/{id}/comments/{comment_id}')]
public function show(
    Product $product,
    #[MapEntity(expr: 'repository.find(comment_id)')]
    Comment $comment
): Response {
}
|
In the example above, the $product argument is handled automatically,
but $comment is configured with the attribute since they cannot both follow
the default convention.
MapEntity Options 
A number of options are available on the MapEntity annotation to
control behavior:
id-
If an
idoption is configured and matches a route parameter, then the resolver will find by the primary key:id オプションが構成されていて、ルート パラメーターと一致する場合、リゾルバーは主キーで検索します。1 2 3 4 5 6
#[Route('/product/{product_id}')] public function show( #[MapEntity(id: 'product_id')] Product $product ): Response { } mapping-
Configures the properties and values to use with the
findOneBy()method: the key is the route placeholder name and the value is the Doctrine property name:findOneBy() メソッドで使用するプロパティと値を設定します: キーはルート プレースホルダー名で、値は Doctrine プロパティ名です:1 2 3 4 5 6 7 8
#[Route('/product/{category}/{slug}/comments/{comment_slug}')] public function show( #[MapEntity(mapping: ['category' => 'category', 'slug' => 'slug'])] Product $product, #[MapEntity(mapping: ['comment_slug' => 'slug'])] Comment $comment ): Response { } exclude-
Configures the properties that should be used in the
findOneBy()method by excluding one or more properties so that not all are used:すべてが使用されないように、1 つ以上のプロパティを除外して、findOneBy() メソッドで使用する必要があるプロパティを構成します。1 2 3 4 5 6 7
#[Route('/product/{slug}/{date}')] public function show( #[MapEntity(exclude: ['date'])] Product $product, \DateTime $date ): Response { } stripNull-
If true, then when
findOneBy()is used, any values that arenullwill not be used for the query.true の場合、findOneBy() を使用すると、null の値はクエリに使用されません。 entityManager-
By default, the
EntityValueResolveruses the default entity manager, but you can configure this:デフォルトでは、EntityValueResolver は defaultentity マネージャーを使用しますが、これを構成できます。1 2 3 4 5 6
#[Route('/product/{id}')] public function show( #[MapEntity(entityManager: ['foo'])] Product $product ): Response { } evictCache-
If true, forces Doctrine to always fetch the entity from the database
instead of cache.
true の場合、Doctrine は常にキャッシュではなくデータベースからエンティティを取得します。
disabled-
If true, the
EntityValueResolverwill not try to replace the argument.true の場合、EntityValueResolver は引数を置き換えようとしません。
Updating an Object 
Once you've fetched an object from Doctrine, you interact with it the same as with any PHP model:
1 2 3 4 5 6 7 8 9 10 11 12 13 14 15 16 17 18 19 20 21 22 23 24 25 26 27 28 29 30 31 |
// src/Controller/ProductController.php
namespace App\Controller;
use App\Entity\Product;
use App\Repository\ProductRepository;
use Symfony\Component\HttpFoundation\Response;
use Symfony\Component\Routing\Annotation\Route;
// ...
class ProductController extends AbstractController
{
#[Route('/product/edit/{id}', name: 'product_edit')]
public function update(ManagerRegistry $doctrine, int $id): Response
{
$entityManager = $doctrine->getManager();
$product = $entityManager->getRepository(Product::class)->find($id);
if (!$product) {
throw $this->createNotFoundException(
'No product found for id '.$id
);
}
$product->setName('New product name!');
$entityManager->flush();
return $this->redirectToRoute('product_show', [
'id' => $product->getId()
]);
}
}
|
Using Doctrine to edit an existing product consists of three steps:
- fetching the object from Doctrine;Doctrine からオブジェクトを取得します。
- modifying the object;オブジェクトを変更します。
- calling
flush()on the entity manager.エンティティマネージャで flush() を呼び出します。
You can call $entityManager->persist($product), but it isn't necessary:
Doctrine is already "watching" your object for changes.
Deleting an Object 
Deleting an object is very similar, but requires a call to the remove()
method of the entity manager:
1 2 |
$entityManager->remove($product);
$entityManager->flush();
|
As you might expect, the remove() method notifies Doctrine that you'd
like to remove the given object from the database. The DELETE query isn't
actually executed until the flush() method is called.
Querying for Objects: The Repository 
You've already seen how the repository object allows you to run basic queries without any work:
1 2 3 |
// from inside a controller
$repository = $doctrine->getRepository(Product::class);
$product = $repository->find($id);
|
But what if you need a more complex query? When you generated your entity with
make:entity, the command also generated a ProductRepository class:
1 2 3 4 5 6 7 8 9 10 11 12 13 14 |
// src/Repository/ProductRepository.php
namespace App\Repository;
use App\Entity\Product;
use Doctrine\Bundle\DoctrineBundle\Repository\ServiceEntityRepository;
use Doctrine\Persistence\ManagerRegistry;
class ProductRepository extends ServiceEntityRepository
{
public function __construct(ManagerRegistry $registry)
{
parent::__construct($registry, Product::class);
}
}
|
When you fetch your repository (i.e. ->getRepository(Product::class)), it is
actually an instance of this object! This is because of the repositoryClass
config that was generated at the top of your Product entity class.
Suppose you want to query for all Product objects greater than a certain price. Add a new method for this to your repository:
1 2 3 4 5 6 7 8 9 10 11 12 13 14 15 16 17 18 19 20 21 22 23 24 25 26 27 28 |
// src/Repository/ProductRepository.php
// ...
class ProductRepository extends ServiceEntityRepository
{
public function __construct(ManagerRegistry $registry)
{
parent::__construct($registry, Product::class);
}
/**
* @return Product[]
*/
public function findAllGreaterThanPrice(int $price): array
{
$entityManager = $this->getEntityManager();
$query = $entityManager->createQuery(
'SELECT p
FROM App\Entity\Product p
WHERE p.price > :price
ORDER BY p.price ASC'
)->setParameter('price', $price);
// returns an array of Product objects
return $query->getResult();
}
}
|
The string passed to createQuery() might look like SQL, but it is
Doctrine Query Language. This allows you to type queries using commonly
known query language, but referencing PHP objects instead (i.e. in the FROM
statement).
Now, you can call this method on the repository:
1 2 3 4 5 6 |
// from inside a controller
$minPrice = 1000;
$products = $doctrine->getRepository(Product::class)->findAllGreaterThanPrice($minPrice);
// ...
|
See Service Container for how to inject the repository into any service.
Querying with the Query Builder 
Doctrine also provides a Query Builder, an object-oriented way to write queries. It is recommended to use this when queries are built dynamically (i.e. based on PHP conditions):
1 2 3 4 5 6 7 8 9 10 11 12 13 14 15 16 17 18 19 20 21 22 23 24 25 26 |
// src/Repository/ProductRepository.php
// ...
class ProductRepository extends ServiceEntityRepository
{
public function findAllGreaterThanPrice(int $price, bool $includeUnavailableProducts = false): array
{
// automatically knows to select Products
// the "p" is an alias you'll use in the rest of the query
$qb = $this->createQueryBuilder('p')
->where('p.price > :price')
->setParameter('price', $price)
->orderBy('p.price', 'ASC');
if (!$includeUnavailableProducts) {
$qb->andWhere('p.available = TRUE');
}
$query = $qb->getQuery();
return $query->execute();
// to get just one result:
// $product = $query->setMaxResults(1)->getOneOrNullResult();
}
}
|
Querying with SQL 
In addition, you can query directly with SQL if you need to:
1 2 3 4 5 6 7 8 9 10 11 12 13 14 15 16 17 18 19 20 21 |
// src/Repository/ProductRepository.php

// ...
class ProductRepository extends ServiceEntityRepository
{
    public function findAllGreaterThanPrice(int $price): array
    {
        $conn = $this->getEntityManager()->getConnection();

        $sql = '
            SELECT * FROM product p
            WHERE p.price > :price
            ORDER BY p.price ASC
            ';
        $stmt = $conn->prepare($sql);
        $resultSet = $stmt->executeQuery(['price' => $price]);

        // returns an array of arrays (i.e. a raw data set)
        return $resultSet->fetchAllAssociative();
    }
}
|
With SQL, you will get back raw data, not objects (unless you use the NativeQuery functionality).
Relationships and Associations 
Doctrine provides all the functionality you need to manage database relationships (also known as associations), including ManyToOne, OneToMany, OneToOne and ManyToMany relationships.
For info, see How to Work with Doctrine Associations / Relations.
Database Testing 
Read the article about testing code that interacts with the database.
Doctrine Extensions (Timestampable, Translatable, etc.) 
Doctrine community has created some extensions to implement common needs such as "set the value of the createdAt property automatically when creating an entity". Read more about the available Doctrine extensions and use the StofDoctrineExtensionsBundle to integrate them in your application.
Learn more 
- How to Work with Doctrine Associations / Relations教義の関連付け/関係を操作する方法
- Doctrine Eventsドクトリンイベント
- How to Implement a Registration Form登録フォームの実装方法
- How to Register custom DQL Functionsカスタム DQL 関数の登録方法
- How to Use Doctrine DBALDoctrine DBALの使い方
- How to Work with multiple Entity Managers and Connections複数のエンティティ マネージャと接続を使用する方法
- How to Define Relationships with Abstract Classes and Interfaces抽象クラスおよびインターフェースとの関係を定義する方法
- How to Generate Entities from an Existing Database既存のデータベースからエンティティを生成する方法
- Store Sessions in a Databaseセッションをデータベースに保存する
- How to Test A Doctrine RepositoryDoctrine リポジトリをテストする方法