Contributing to the Documentation 
Before Your First Contribution 
Before contributing, you need to:
- Sign up for a free GitHub account, which is the service where the Symfony
documentation is hosted.無料の GitHub アカウントにサインアップしてください。これは、Symfony のドキュメントがホストされているサービスです。
- Be familiar with the reStructuredText markup language, which is used to
write Symfony docs. Read this article
for a quick overview.Symfony のドキュメントを書くために使用される reStructuredText マークアップ言語に慣れてください。簡単な概要については、この記事をお読みください。
Fast Online Contributions 
If you're making a relatively small change - like fixing a typo or rewording something - the easiest way to contribute is directly on GitHub! You can do this while you're reading the Symfony documentation.
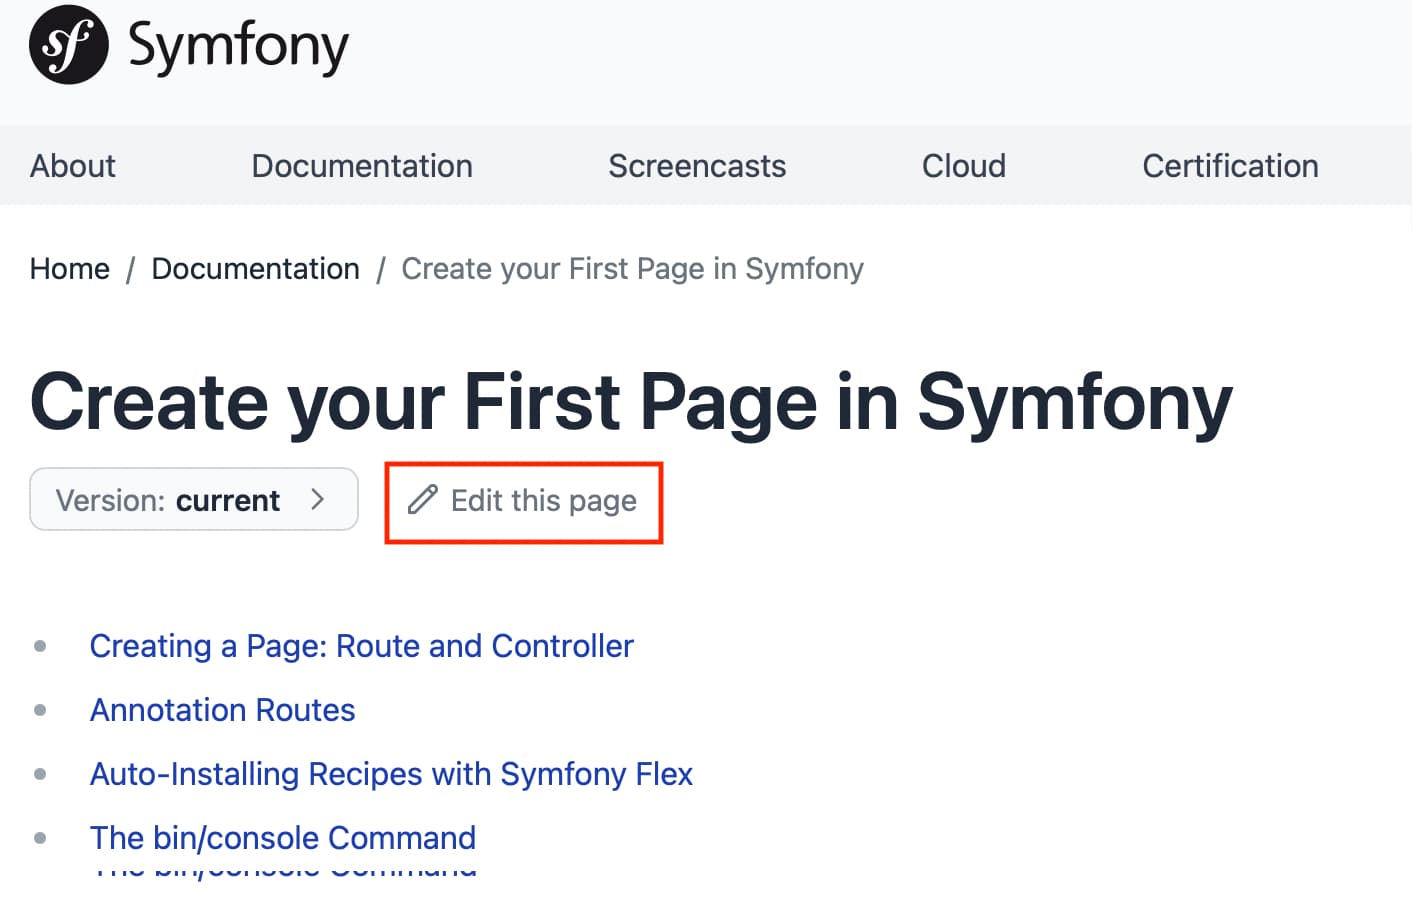
Step 1. Click on the edit this page button on the upper right corner and you'll be redirected to GitHub:
Step 2. Edit the contents, describe your changes and click on the Propose file change button.
Step 3. GitHub will now create a branch and a commit for your changes (forking the repository first if this is your first contribution) and it will also display a preview of your changes:
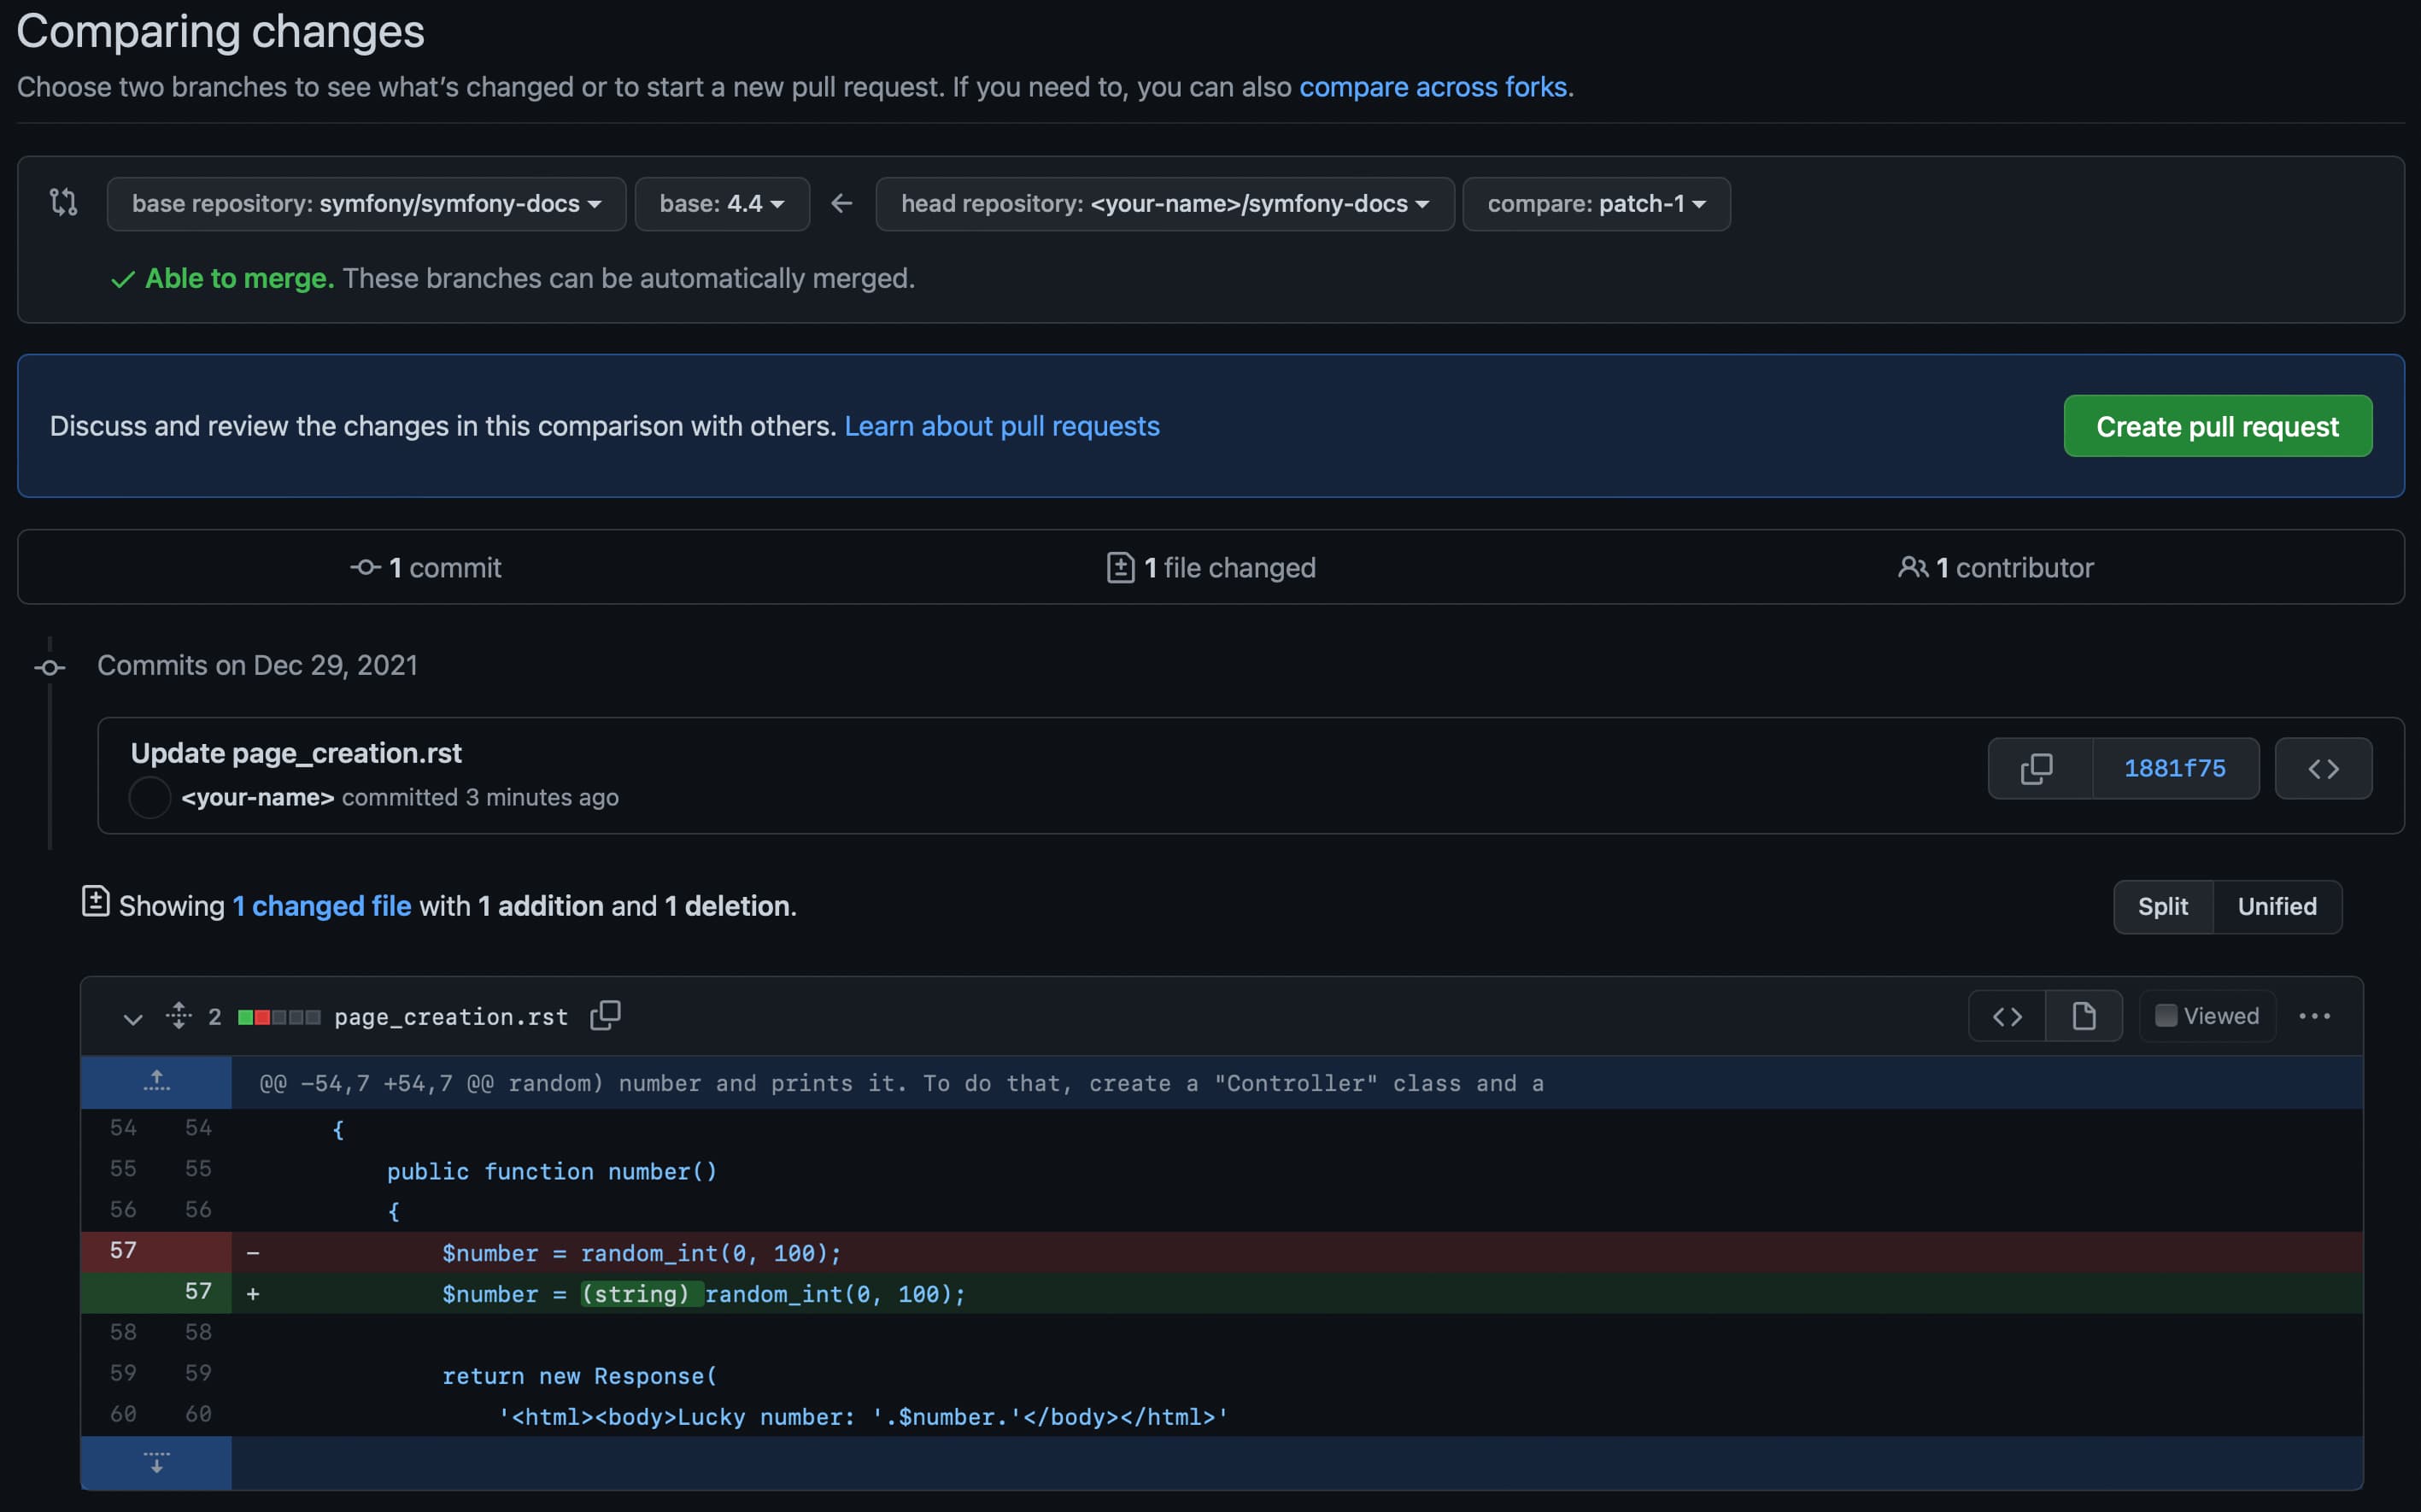
If everything is correct, click on the Create pull request button.
Step 4. GitHub will display a new page where you can do some last-minute changes to your pull request before creating it. For simple contributions, you can safely ignore these options and just click on the Create pull request button again.
Congratulations! You just created a pull request to the official Symfony documentation! The community will now review your pull request and (possibly) suggest tweaks.
If your contribution is large or if you prefer to work on your own computer, keep reading this guide to learn an alternative way to send pull requests to the Symfony Documentation.
Your First Documentation Contribution 
In this section, you'll learn how to contribute to the Symfony documentation for the first time. The next section will explain the shorter process you'll follow in the future for every contribution after your first one.
Let's imagine that you want to improve the Setup guide. In order to make your changes, follow these steps:
Step 1. Go to the official Symfony documentation repository located at github.com/symfony/symfony-docs and click on the Fork button to fork the repository to your personal account. This is only needed the first time you contribute to Symfony.
Step 2. Clone the forked repository to your local machine (this example
uses the projects/symfony-docs/ directory to store the documentation; change
this value accordingly):
1 2 |
$ cd projects/
$ git clone git@github.com:YOUR-GITHUB-USERNAME/symfony-docs.git
|
Step 3. Add the original Symfony docs repository as a "Git remote" executing this command:
1 2 |
$ cd symfony-docs/
$ git remote add upstream https://github.com/symfony/symfony-docs.git
|
If things went right, you'll see the following when listing the "remotes" of your project:
1 2 3 4 5 |
$ git remote -v
origin  git@github.com:YOUR-GITHUB-USERNAME/symfony-docs.git (fetch)
origin  git@github.com:YOUR-GITHUB-USERNAME/symfony-docs.git (push)
upstream  https://github.com/symfony/symfony-docs.git (fetch)
upstream  https://github.com/symfony/symfony-docs.git (push)
|
Fetch all the commits of the upstream branches by executing this command:
1 |
$ git fetch upstream
|
The purpose of this step is to allow you work simultaneously on the official Symfony repository and on your own fork. You'll see this in action in a moment.
Step 4. Create a dedicated new branch for your changes. Use a short and
memorable name for the new branch (if you are fixing a reported issue, use
fix_XXX as the branch name, where XXX is the number of the issue):
1 |
$ git checkout -b improve_install_article upstream/5.4
|
In this example, the name of the branch is improve_install_article and the
upstream/5.4 value tells Git to create this branch based on the 5.4
branch of the upstream remote, which is the original Symfony Docs repository.
Fixes should always be based on the oldest maintained branch which contains
the error. Nowadays this is the 5.4 branch. If you are instead documenting a
new feature, switch to the first Symfony version that included it, e.g.
upstream/6.2.
Step 5. Now make your changes in the documentation. Add, tweak, reword and even remove any content and do your best to comply with the Documentation Standards. Then commit your changes!
1 2 3 |
# if the modified content existed before
$ git add setup.rst
$ git commit setup.rst
|
Step 6. Push the changes to your forked repository:
1 |
$ git push origin improve_install_article
|
The origin value is the name of the Git remote that corresponds to your
forked repository and improve_install_article is the name of the branch you
created previously.
Step 7. Everything is now ready to initiate a pull request. Go to your
forked repository at https://github.com/YOUR-GITHUB-USERNAME/symfony-docs
and click on the Pull Requests link located in the sidebar.
Then, click on the big New pull request button. As GitHub cannot guess the exact changes that you want to propose, select the appropriate branches where changes should be applied:

In this example, the base fork should be symfony/symfony-docs and
the base branch should be the 5.4, which is the branch that you selected
to base your changes on. The head fork should be your forked copy
of symfony-docs and the compare branch should be improve_install_article,
which is the name of the branch you created and where you made your changes.
Step 8. The last step is to prepare the description of the pull request. A short phrase or paragraph describing the proposed changes is enough to ensure that your contribution can be reviewed.
Step 9. Now that you've successfully submitted your first contribution to the Symfony documentation, go and celebrate! The documentation managers will carefully review your work in short time and they will let you know about any required change.
In case you are asked to add or modify something, don't create a new pull request. Instead, make sure that you are on the correct branch, make your changes and push the new changes:
1 2 3 4 5 6 |
$ cd projects/symfony-docs/
$ git checkout improve_install_article

# ... do your changes

$ git push
|
Step 10. After your pull request is eventually accepted and merged in the Symfony documentation, you will be included in the Symfony Documentation Contributors list. Moreover, if you happen to have a SymfonyConnect profile, you will get a cool Symfony Documentation Badge.
Your Next Documentation Contributions 
Check you out! You've made your first contribution to the Symfony documentation! Somebody throw a party! Your first contribution took a little extra time because you had to learn a few standards and set up your computer. But from now on, your contributions will be much easier to complete.
Here is a checklist of steps that will guide you through your next contribution to the Symfony docs:
1 2 3 4 5 6 7 8 9 10 11 12 13 14 15 16 17 18 19 |
# create a new branch based on the oldest maintained version
$ cd projects/symfony-docs/
$ git fetch upstream
$ git checkout -b my_changes upstream/5.4

# ... do your changes

# (optional) add your changes if this is a new content
$ git add xxx.rst

# commit your changes and push them to your fork
$ git commit xxx.rst
$ git push origin my_changes

# ... go to GitHub and create the Pull Request

# (optional) make the changes requested by reviewers and commit them
$ git commit xxx.rst
$ git push
|
After completing your next contributions, also watch your ranking improve on the list of Symfony Documentation Contributors. You guessed right: after all this hard work, it's time to celebrate again!
Review your changes 
Symfony repository checks every Pull Request automatically to look for common errors, inappropriate words, syntax issues in code blocks, etc.
Optionally you can also build the docs in your local machine to debug issues or to read the documentation offline. To do so, follow the instructions included in the README file of symfony-docs repository.
Frequently Asked Questions 
Why Do My Changes Take So Long to Be Reviewed and/or Merged? 
Please be patient. It can take up to several days before your pull request can be fully reviewed. After merging the changes, it could take again several hours before your changes appear on the Symfony website.
Why Should I Use the Oldest Maintained Branch Instead of the Latest Branch? 
Consistent with Symfony's source code, the documentation repository is split
into multiple branches, corresponding to the different versions of Symfony itself.
The latest (e.g. 5.x) branch holds the documentation for the development branch of
the code.
Unless you're documenting a feature that was introduced after Symfony 5.4,
your changes should always be based on the 5.4 branch. Documentation managers
will use the necessary Git-magic to also apply your changes to all the active
branches of the documentation.
What If I Want to Submit my Work without Fully Finishing It? 
You can do it. But please use one of these two prefixes to let reviewers know about the state of your work:
[WIP](Work in Progress) is used when you are not yet finished with your pull request, but you would like it to be reviewed. The pull request won't be merged until you say it is ready.[WIP] (進行中の作業) は、プル リクエストがまだ完了していないが、レビューを希望する場合に使用されます。プル リクエストは、準備ができていると言うまでマージされません。[WCM](Waiting Code Merge) is used when you're documenting a new feature or change that hasn't been accepted yet into the core code. The pull request will not be merged until it is merged in the core code (or closed if the change is rejected).[WCM] (Waiting Code Merge) は、コア コードにまだ受け入れられていない新しい機能または変更を文書化するときに使用されます。プル リクエストは、コア コードにマージされるまで (または変更が拒否された場合は閉じられるまで) マージされません。
Would You Accept a Huge Pull Request with Lots of Changes? 
First, make sure that the changes are somewhat related. Otherwise, please create separate pull requests. Anyway, before submitting a huge change, it's probably a good idea to open an issue in the Symfony Documentation repository to ask the managers if they agree with your proposed changes. Otherwise, they could refuse your proposal after you put all that hard work into making the changes. We definitely don't want you to waste your time!